Zest Locators coming out: suggestions?

I have a patient who has complete maxillary and complete mandibular overdentures. He had a total of 8 implants (4 implants and Zest Locators installed in the maxilla and 4 in the mandible). I performed a chair side pickup of the Locator housings and chair side relines. Every 6 months or so, a Locator or two comes out. I have even relined the entire denture several times and picked up all the Locators. Other times I have just relined the Locator housing that has come out. The manufacturer recommended I reduce the retention by replacing nylon housings. I did this but it did not solve the problem. I recommended a hybrid fixed-detachable denture with addition of more implants but finances are an obstacle at this time. There are also some fracture lines forming along both dentures that have been repaired numerous times. Any suggestions would be appreciated.

15 Comments on Zest Locators coming out: suggestions?

New comments are currently closed for this post.
Gregori Kurtzman, DDS, MA
12/30/2014
So the males in the metal housings are coming out of the denture? Key to this is make sure the metal housing is clean of any debris and place some resin on the housing in the mouth making sure to get the resin into the retention areas on the housing place additional in the receptor well in the denture and have the patient lightly close and hold for 4 minutes allowing the resin to set this should lock them in the denture
ROBERT CADALSO
12/30/2014
REPLACE AT LEAST SOME IF NOT ALL OF THE MALES WITH EXTENDED RANGE MALES (USED WHEN THE LOCATORS ARE NOT PARRALLEL AND ARE DIVERGENT UP TO 40 DEGREES) THIS SHOULD CURE THE PROBLEM!
Charles Schlesinger
12/30/2014
In addition to Gregori's recommendation, create a vent hole on the palatal for each area where you are picking up the housing. The excess acrylic will come out along with any potential trapped air. if your denture continues to have fractures it may be due to not enough denture base between the housing and the intraoral surface. you need 3-4mm minimal thickness to resist fracturing.
Richard J. Pitz
12/30/2014
1) blast the outer male housing with 50 micron aluminum oxide as well as the denture base. Use an acrylic that is compatible with the base to cement the male. 2) make sure the acrylic is not too thick 3) vent hole 4) if there is poor path of insertion past the ability of the anchor's tolerance, you may continue to have problems 5) all dentures need reinforcement. I use Dentapreg denture reinforcement (pink) in all the implant supported dentures. This cuts the the deflection of the base that can cause these anchors to come loose.
Jeff Tarlow
12/30/2014
Use airborne particulate abrasion (Microblaster) on the stainless steel housing (metal only) with 50-60 micron aluminous oxide. First create small undercuts in housing using 34 inverted cone high speed carbide. Intraoral dry field is critical.
Carlos Boudet, DDS
12/30/2014
It is very hard to try to guess what the cause of the problem is without watching your technique. A very easy alternative is for you to do the following: Do a pickup impression of the black laboratory attachment and send it to the lab for processing. If you still would like to try and cure them in the mouth try a new material such as ERA EZ pickup. Here is the link: http://www.ddsgadget.com/era-pickup-self-curing-attachment-pickup-material.html I have tried it and it works well. Good luck and I hope this helps.
Min-Sung Yoon, DDS MS
12/30/2014
The nylon attachments coming out from the metal housing can be caused by a divergence issue. If you are using blue, pink or clear attachments I would recommend that you use the extended range nylon attachments.
Manosteel
12/30/2014
You may also check to see if the patient is Bruxing. Have them leave the dentures out at night. A relatively flat cusp angled tooth may also help dissipate forces. One thing that can help in retention of the metal cap in acrylic, is to gritblast the outside and keep it clean during the acrylic pickup. We use either 1 cm pieces of punched rubber dam or cut gum rubber tubing over the zest males depending on the exposed vertical height of the male,, place the caps and black processing inserts then cold cure in with acrylic after venting the denture on the lingual.
Mike
12/30/2014
Thank you all for the helpful input! The manufacturer also recommended creating a dovetail on the denture before picking up the metal housing. Thanks again,
Tuss
12/31/2014
If the denture is showing signs of cracks etc then have you checked that the patient is not wearing the dentures while sleeping and (even though wearing full dentures) some patients are bruxers - parafunctional habits so denture woudl overload under those forces and may be causing the problems
mpedds
12/31/2014
Definitely have the patient leave the dentures out at night. Check the occlusion on the denture. Good solid centric on all teeth, check all excursive motions for balance and no interferences.
Tuss
12/31/2014
Are you picking up using standard cold cure acrylic resin (same as dentures made of or are the dentures based on a composite type resin) or one of the current composite type systems. The denture and the pick-up material should be the same type. When you mix the cold cure are you applying it "wet" or waiting until it is in a dough state. If its in a dough state then apply (wet) the outer surface of the metal female housing with some monomer before seating and make sure wait until the resin is set on the bench top before trying to remove. If all that fails I would go back if possible see how much wear is occuring on the denture teeth etc as patients may swaer blind they are taking teeth out at night but are actually sleeping with teeth in. Hope that helps
Dr. Joshi
1/1/2015
Check if the locator abutments are at the same level. Disparity in the plane of locators can cause excessive stress on them.
John Ackley
1/7/2015
If this problem is predominately on the maxilla you may have exceeded the divergence/convergence limits of the attachment. Due to the typical premaxilla flare this is a common problem on maxillary cases. We have found on the maxilla a spherical attachment is easier to parallel and is less problematic. The Rhein83 Spheroblock is our go to abutment in these situations. They come with paralleling wedges to align the housings before picking them up, they come in 2 sizes and multiple colored nylons to adjust retentive levels. These should be in everyone's toolboxes if you are doing implant supported overdentures.
TK
1/14/2015
I began treating essentially the same patient two years ago. I repaired his dentures perhaps a dozen repairs in the first six months. One time, just after delivering a hard reline, he clenched down as hard as he could to show me that he could fracture it again. The other problem he had is that he would wear out the inserts within two weeks. There was nothing wrong with the prosthetics, the flange had adequate thickness and they had adequate vertical dimension. He simply has a ferocious bite, is a bruxer and refuses to take them out at night. Ultimately, I made him a new set of dentures with a metal framework. When they arrived from the lab I immediately returned them and asked that the thickness of the buccal flange be doubled to provide additional stability. I delivered them with 8 white (5 lb) inserts (only he can take it in and out) and it took him 8 months to fracture the acrylic and break out the front four teeth, so I have declared it a victory. Most hints have been listed previously, here are a few that I learned with him: 
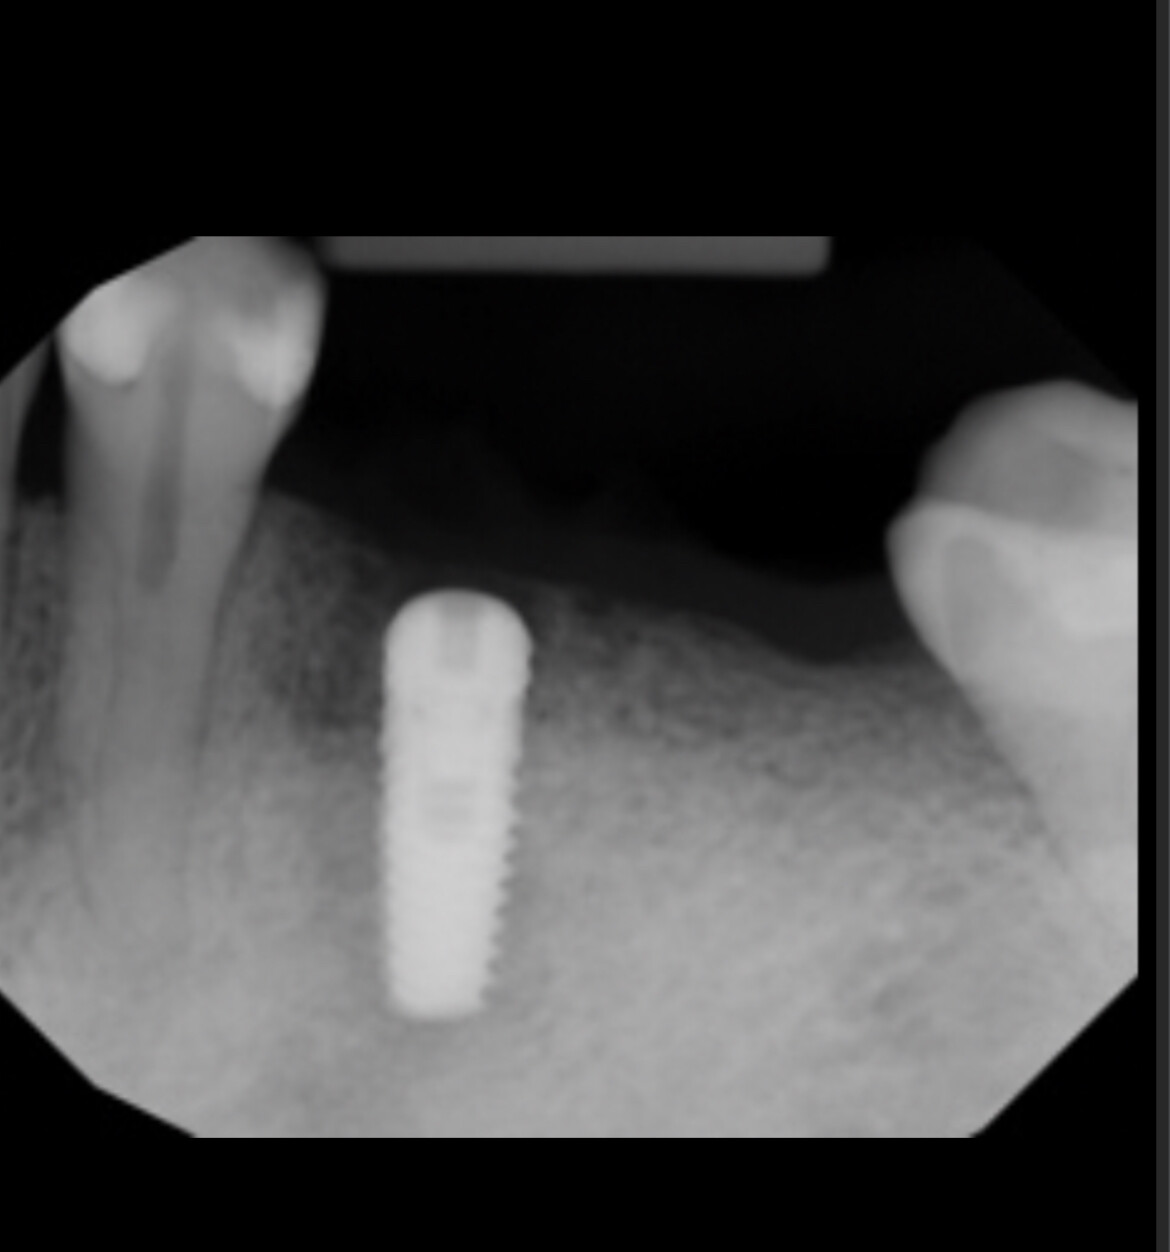
1) I corrected the divergence of the upper implants by replacing the Locator abutments with angled GPS abutments from Implant Direct (I still use Locator housings and inserts). They are now within 5 degrees and the inserts now wear normally. 2) I only use cold cure acrylic when picking up his housings. Some products are advertised for that purpose, but do not bond to the denture base (they stay in place either with an adhesive or mechanical retention). That results in a weak point where the denture can fracture. 3) When picking up housings, I personally hold the denture in place with light finger pressure for a full 11 minutes. I no longer trust patients to "close down lightly and don't move." 4) I adjust the occlusion after the housings have been picked up and the inserts are in place. 5) I added a ribbon in the upper last time it was repaired, but I have no way of quantifying if that has strengthened it. I understand the frustration of having a patient walk in once a week with a fractured denture in hand expecting that it be repaired immediately. Best of luck, that's how I did it.

Featured Products

OsteoGen Bone Grafting Plug
Combines bone graft with a collagen plug to yield the easiest and most affordable way to clinically deliver bone graft for socket preservation.
CevOss Bovine Bone Graft
Make the switch to a better xenograft! High volume of interconnected pores promotes new bone. Substantially equivalent to BioOss and NuOss.