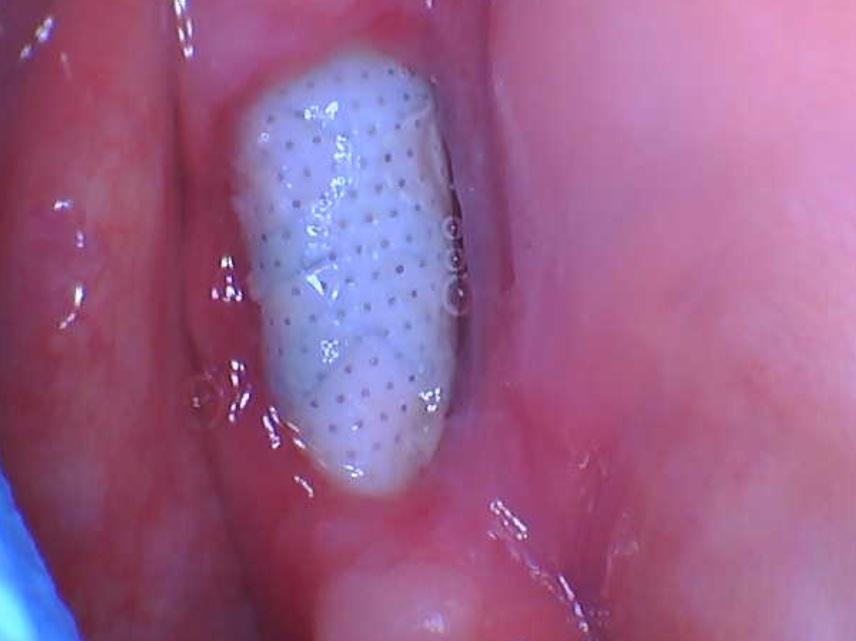
Can’t get Crown Seated: Any Suggestions?
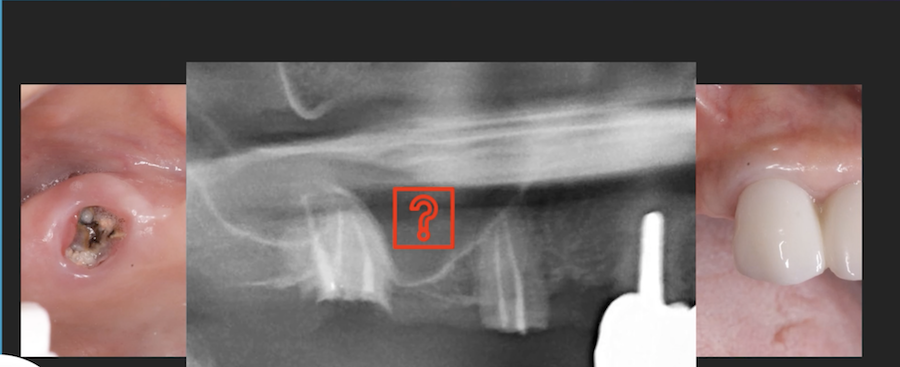
A 3.0 x 10mm implant was placed at the oral surgeon to replace tooth 22. I had no issues with my impression coping and took an x-ray to confirm it was fully seated. Today, I could not get the crown seated at the correct angle. Please see attached x-ray. I adjusted proximal contacts. It was a tough one to rotate in the mouth as it was placed pretty far subgingival and it was a tight M-D space between 21 and 23. Any suggestions on what I could do here?
Thanks

23 Comments on Can’t get Crown Seated: Any Suggestions?
New comments are currently closed for this post.
Timothy C Carter
6/5/2019
Take another impression. In spite of your best efforts something got distorted. One possible remedy is to use a rigid material around the impression coping and to use an open try impression. Just a suggestion as I usually use a medium body closed tray technique but sometimes I have to deviate from my norm.
Howard Abrahams
6/5/2019
Trim M of 21
Mwjddd,ms
6/5/2019
This looks like a one piece screw retained crown. These are nearly impossible to seat in tight spaces and when the tissue cuff is deep. You also have a problem with the size difference between the healing abutment diameter and the wider diameter of the restoration.
Do... You should have made this restoration in two pieces. Then you seat the abutment first, to making sure the abutment is indexed be properly. The finish line should be at or slightly below the tissue level. Then try in the crown. Once the contacts and occlusion are adjusted simply cement the crown. That way you deal with all variables independently and are not fighting tissue thickness, proximal contacts and hex indexing all at the same time. ab
Richard Hughes DDS
6/5/2019
Reimpress!
Carlos Boudet, DDS DICOI
6/5/2019
The internal connection may not be in the same direction as the necessary path of placement, making the seating of a screw retained crown very difficult without putting excessive pressure on the adjacent teeth.
You may have to use a custom abutment to bring the crown margins to an acceptable level and use a cemented restoration.
Dr. Gerald Rudick
6/5/2019
Check the contacts of the crown against the adjacent teeth....it should be flossable…...if still not seated, gently reduce the inside of the crown with a diamond bur... and try several times, grinding a little more each time....when you have a good fit, as verified in an xray +/or comfortable position in the mouth, place a rubber dam with a very small hole punched out over the implant abutment, and place temporary cement in the crown... the rubber dam will control the outflowing of excess cement …..see if this works, before staring to redo the impression,, etc.
Dr Mosquera
6/5/2019
You may still be able to keep adjusting and seat the crown but you may end up with large dark triangles cuz of the tilt of adjacent teeth. I would adjust proximal surfaces of adjacent teeth and re-impress. that way path of insertion will improve as well as diminishing interproximal space that may cause more plaque accumulation.
UK Prostho
6/5/2019
The Crown isn't seating so just totally clear the proximal contact so the crown is not touching the adjacent teeth and see if it fully seats with the incisal edge in the correct vertical position. If it does then its a porcelain build up issue not the impression. If the edge is in a totally different position compared to that the master cast then its an impression issue so retake the impression. Not difficult to address.
Bonedoc
6/5/2019
Has nobody noticed that the implant has a large radiolucency its entire length? This is a failed implant. The crown is seating fine, the implant is exfoliating and hence the incisal edge seems higher than the adjacent teeth!
Mwjddsms
6/5/2019
That's not the implant that's the abutment
Neil Zachs
6/5/2019
I thought the same thing as bonedoc...looks like the implant is failing or failed. And if that is the abutment, then the Implant to crown ratio is poor.
Mwjddsms
6/5/2019
There are no threads on the titanium in the radiograph and you can see the hex at the inferior portion of the abutment which is not engaging the implant. The implant is barely in the film
Dr.Almalik
6/5/2019
Redo the impression, Do it as a cemented crown (2 pieces using a well fabricated jig to help you to place the abutment) then you can insert the crown or do a pick up impression for the framework of the crown then send it for porcelain application . And temporize it if possible. The main problem is that implant is so deep and soft tissue is preventing the correct seating.
Dok
6/5/2019
Contours of the adjacent teeth prevent an easy path of insertion for the crown because of the angulation of the implant. Conservatively and judiciously strip the sides of the adjacent teeth until you have created a glide path for the crown. Even if you remake the crown some stripping will probably have to occur.
Dr Dale Gerke, BDS, BScDe
6/5/2019
All of the above may be correct. But perhaps before you rush to make a new crown, which I suspect will have the same problem, consider this.
However I have found similar problems with deeply placed implants. This is particularly when the platform diameter is small and there is a considerable depth of soft tissue.
My experience would indicate there is “soft tissue pushback”. While it sometimes seems to clinicians that we can easily push soft tissue out of the way and reshape the emergence profile at the final phase, this is usually not the case. Laboratory technicians often exacerbate such a problem by over contouring the “soft tissue channel”; either to mask the metal abutment (ie make the crown more aesthetic) or to create a better emergence profile and make the crown look more “normal”.
When this happens, I have found it can be very hard to locate the abutment and crown into the implant. Quite often the screw or end of the abutment will get caught on the edge of the implant. In your case, this seems to be what has happened.
I suggest you check the crown fits on the model well. In such a case as I have described above, the soft tissue silicone around the analogue will make it very difficult to allow the abutment and crown to seat properly. Then remove the soft tissue silicone and see if the crown fits well. If it does, then it is a good indication that the abutment and crown fit well without soft tissue. I have found often the laboratory will remove the silicone and construct the crown without it in place.
If this seems to be the problem, you will need to trim the abutment and crown until the abutment and crown fit easily on the model with the silicone in place. In your case it seems to me that the abutment and crown have a very wide diameter in comparison to the implant. So I suspect a lot of trimming will be required. The problem then is; can you place an aesthetic crown after the trimming? Often this cannot be done unless the lip line covers the problem.
In your case, a possible solution is to not modify the abutment/crown but to widen the emergence profile with a wider healing cap. If there are none available then you can use the existing one but widen it with flowable resin around the existing cap. You may have to do this outside the mouth. However remember to make the extension circular or it will be hard to screw the cap into place. Alternatively make a small flap to allow you to place resin around the cap in situ and then suture the flap back. Either way, allow 4 weeks for re-contouring to happen. However when you eventually place the crown you must do it quickly because the tissue will collapse within 2-5 minutes usually.
I also recommend you check the path of insertion on the model and make sure you duplicate it in the mouth. When there is soft tissue push back, it can be such a struggle that you find it hard to locate the abutment into the implant because you cannot find the right path of insertion (ie the abutment gets caught on the lip of the implant).
Lastly, if after trying the crown on the model without the silicone in place and you are sure the crown fits, you could raise a small flap around the implant (to bone height ) and release the soft tissue tension. I suspect the implant would then fit well. Then suture the flap back and let things heal. The reason I did not suggest this initially is because I suspect the abutment/crown is too wide in any case, thus I think the gingiva and papilla might not end up healthy of aesthetically acceptable. So unfortunately you might still need to reduce the diameter.
Good luck. You have plenty of suggestions from many experienced dentists, so you will need to consider them all and apply the comments to your situation.
Matt Helm DDS
6/5/2019
The x-ray is plainly evident: the abutment is not seating inside the implant because the crown itself is in the wrong position mesio-distaly. In order to seat this crown you would have to reduce the distal contact so much that by the time you're done you'll have a completely open mesial contact. Re-impress and and use a two-piece system, separate crown and abutment, so you can seat the abutment first. This is even more warranted due to the tight space. It's not soft tissue holding you back, the whole crown is off its proper position completely vis-a-vis the implant neck. You'll simplify it by using separate abutment and crown, and you'll be able to break it up into its component parts and deal only with the crown fit. This crown is simply a loss. Re-do.
Dr. Bill Woods
6/5/2019
If the lab correctly poured up the analog , they should have advised you that a screw retained crown would not have worked. Something went wrong. If the implant impression coping was correctly angled to the palatal, then you could slightly disc the M and D line angles from the adjacent teeth and reimpress. Make a custom abutment. Seat that with a seating verification jig. Then cement a new crown. The implant angle looks different from the implant screw on the PA. I think thats the issue. Happy implanting. Hope the solution chosen goes smoothly. We've all had issues to conquer. Bill
Vladimir Melnikov
6/5/2019
There was not enough room for impression material to get a stable impression coping even with an open tray. I would try to recontour adjacent teeth slightly, reimpress with just heavy body Impregum, pour the model and make verification jig before sending to the lab to avoid another remake.
RWag
6/5/2019
Also consider since he crown is so far under the gumline that there could be some soft tissue near the feather edge of the crown that is preventing complete seating besides the tight inter proximal fit of that crown which is too wide subgingival.
Emil
6/5/2019
The challenge with a single screw-in crown is that the dentist must get both the path of insertion and the implant-abutment screw channel alignment right at the same time ... while adjusting contacts. This is very difficult at the best of times, but even more difficult when the implant is skinny and deep. I would install the abutment first (hybrid custom abutment) and then cement the crown. I would use a Reverse Margin design to control cement. The abutment has no contacts with adjacent teeth. Then it is easier to deal with contacts at the crown level. That is challenging enough. :-)
Khai Vu, DDS
6/5/2019
Implant was placed too deep, and the bones are probably interfering with the seating of the abutment/crown. You may need to clear off some bone covering the implant occlusal surface
Sean Yockus
6/6/2019
There are long proximal contacts on the crown - Periodontitis central. Parkell sells a pale blue tinted paint on/ air dry interproximal contact check. It is almost like typing or ink correction fluid - 'White Out'. Try it - it may need to be reapplied multiple times after making proximal adjustments to: the crown, mesial enamel of #21, and/or the distal enamel of #23. It is tedious and time consuming but superior to an assistant trying to hold articulating paper horizontally against adjacent teeth repeatedly as you try the crown in and out. There is zero forgiveness with a screw retained crown. The longer and broader the proximal contacts - the worse it is and longer it will take. Short of going back to the implant level master model with its soft tissue moulage removed and custom drilling/refining a stock abutment (keeping your self created margin only 1-2 mm subgingival to avoid a scenario of expressing cement into the peri-implant biology), sending this back to the lab and asking for a new cementable crown. You could also absorb the lab fee for a custom milled abutment and new cementable crown. Either of those two options will take some extra time, but likely fit like a glove and increase the patient's confidence.
Yes, the fee for the screw-retained crown was already expensive. If you spend more than an hour chair side with the proximal contact adjusting, bite the bullet, save face and start over.
Terence Lau, DDS, FICOI,
6/22/2019
Simply adjust the adjacent teeth for draw and undercuts and retake the impression via open tray technique and have lab fabricate (or check) seat ability on a solid model.

